Installing a Residential Flagpole
Installing A Residential Flagpole
Lay all flagpole components out. If missing a part from the attached parts diagram, please call for the replacement parts.
STEP 1 - Remove all wrapping materials and place unwrapped pole on cribbing or other wood support on ground (preferably in a covered dry area). If Pole is Multi Section, carefully lay sections out in proper order, grouping poles with like match marks. Sections MUST BE STRAIGHT & LEVEL while sliding together. Line up match mark numbers, imprinted at each section, for proper fit. Lightly sand away any burrs that may be present on the male section or in the upper section of the joint. A small amount of lubrication (silicone or dish washing liquid – by others) may be applied to the male portion of the joint for easier fitting. Start with the bottom sections and work toward the top. Begin sliding the two sections, rolling the pole by 180° with every 2 to 3 inches to facilitate an easier fit. (If EXTREME difficulty is found in fitting the first 6 inches together, pull back apart and cool the male section with ice for several minutes). A sledgehammer and block of wood (to protect the pole from direct impact) may be necessary on larger poles to complete the assembly of joints. All Star Flags suggests the use of an epoxy adhesive for aluminum with poles of 60’ length.
STEP 2 - Identify parts and place them along the pole according to the parts diagram.
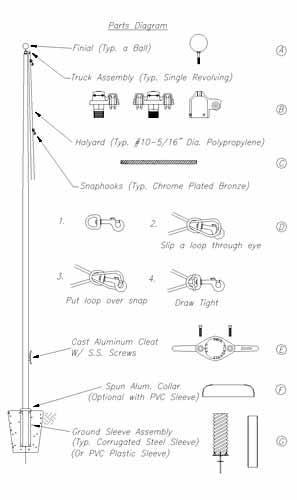
STEP 3 - Starting with the finial ball (part A), screw the ball’s spindle into truck (part B). Do not grip ball to tighten, grip spindle/rod with vise grips and tighten. Tighten all nuts and set screws. (Epoxy or loc-tite type product is recommended on all connections, this material not furnished).
STEP 4 - Attach the truck (part B) with ball by screwing into the threaded top of the flagpole (Do not epoxy spindle of truck). If truck (part B) is a stationary truck, be sure to secure all set screws.
STEP 5 - Feed the polypropylene rope (part C), around the pulley of the truck (part B) and down the side of the flagpole to the cleat area. Tie both ends together forming a complete loop. Space the snap hooks and neoprene covers (part D) at equal distance on either side of the knot to accommodate flag size.
STEP 6 - Fasten cleat (s) (part E) into position using the self-drilling screws provided. IMPORTANT NOTE: The cleat(s) are typically installed at 4’-6” ABOVE FINISHED GRADE. When installing the cleat prior to setting the pole, MAKE SURE TO ALLOW FOR DEPTH OF SLEEVE. Use cleat as template for installation. A pilot hole or drilling oil may be used to facilitate installation. If a second cleat is desired, it is typically mounted at 180 degrees from the first. For installations involving more than two cleats, refer to shop drawings for correct positioning and orientation. For cleat box installation, use drill and tap kit to prepare holes in shaft. Align box and cleat over holes, and fasten to pole using provided bolts.
STEP 7 - Before standing flagpole, slide the flash collar (part F) up from bottom and secure at the location of the cleat holes with tape on underside of flash collar to prevent slipping.
STEP 8 - Stand flagpole into previously installed ground sleeve. (May require crane or backhoe for larger flagpoles. Always choke multiple section poles below lowest joint as a safety precaution). Caution: When installing, the pole should be assembled as close as possible to the final support point. Professionals experienced in such installations should perform rigging and lifting. During lift keep clear of area and reach of pole path. Do not pass pole overhead. When installing multi-piece flagpoles, arrange the rigging for the lift in such a way that weight of the pole sections is supported from the bottom of the pole so that the flagpole joints are pushed together not pulled apart during the lift. Keep clear of power lines.
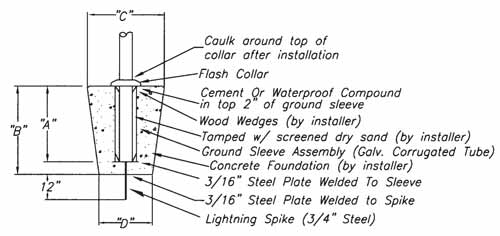
STEP 9 - After inserting flagpole into ground sleeve (corrugated tube), plumb flagpole with wooden wedges (supplied by others). Fill space between ground sleeve and flagpole with screened dry sand. Fill ground sleeve 6” to 8” at a time and tamp as you fill. Fill ground sleeve with sand to about 2” from top. Then cap off with waterproof cement. For PVC ground sleeve, insert flagpole into plastic sleeve, turn to align truck assembly with the wind, plumb pole, fill remaining void with dry sand, and top off with thin layer of waterproof cement or caulking.
STEP 10 - After waterproof cement and silicone has dried slide flash collar (part F) down into position and caulk with matching color silicone around flagpole and flash collar to seal the space between the flagpole and the flash collar.
Common questions and answers for installing your flagpole.
Is all the hardware we need to install our flagpole included with the flagpole?
All hardware is included, as well as a ground sleeve, in the flagpole package. However, there are installation materials (concrete, wood wedges, sand, etc.) that are not included.
Why is a flagpole actually longer than its designation?
A flagpole is designated by the above ground height. The actual length includes the portion of the pole that goes in the ground. (Ground set only.)
How much of a flagpole is underground?
The rule of thumb is that 10% of the above ground height of a pole is underground. For example, a 20' pole is actually 22' long because 2' (10%) is underground.
How do I know how big to make the hole?
A good guideline to follow is that the hole should be roughly 3-4 times larger than the diameter of the pole. Foundation size may vary and depends on local soil conditions. Soil conditions other than optimum (e.g., wet, unstable, sandy, in a frost area, etc.) may require assistance from a foundation engineer.
Does the top of the ground sleeve need to be sealed?
Yes, the ground sleeve must be sealed to keep out water. If the sand in the sleeve gets wet the pole will most likely shift. We suggest the top 2" of the ground sleeve be filled with a waterproof compound.
How can a level be used to plumb a tapered pole?
The tapered flagpoles have a portion of the pole at the base that is not tapered. Usually you will be safe using the bottom five exposed feet for the level.
How close should a pole be installed to other poles or objects?
The size flag that will be flown will determine the distance. Allow at least one foot more than the length of the flag.
NOTE: Be very cautious when working around power lines. If a pole comes in contact with a power line, serious injury or death can occur to anyone standing nearby.
How long should the concrete set before putting the flagpole in the sleeve?
The rule of thumb is that concrete should be allowed to set at a rate of 24 hours for each yard of concrete.
How should the flagpole be grounded?
If the foundations are set in soil, the concrete foundation, anchor bolts or lightning spike, and soil will provide adequate protection for the pole itself.
Is a flash collar needed for an installation?
Flash collars are only needed when there will be a concrete pad around the base of the pole. The purpose of the flash collar is to hide the top of the ground sleeve while deflecting water away. If your installation is in a flowerbed or lawn area, dirt, rocks, bark, or grass can be pulled up to the pole making a collar unnecessary.
Should I place lights on my flagpole?
It is customary to light the flag when being flown 24 hours a day. We suggest lights mounted away from the flagpole, spot lighting the flag for proper patriotic illumination.
Should the wooden wedges be left in or taken out when the installation is complete?
The wooden wedges should be removed after the pole is set in sand. This allows for the natural movement of the pole as it vibrates in the wind. Also removal of the wedges provides a more even stress point for the pole.
What are some tips for putting the flagpole sections together?
Warm temperatures cause aluminum to expand making the joint tight. Put a bag of ice on the male section of the joint for a few minutes to cool the pole so the joint will go together better. If that doesn’t work, coat both joint surfaces with liquid soap, along with water to dilute the soap. This cuts friction and allows for easy clean up.
NOTE: Don't use any kind of oil.
By Chad Creech, All Star Flags